List Management in HelloLeads CRM
What is a List?
In HelloLeads CRM, a List is a way to group and organize your leads and customers based on criteria that matter to your business. Think of Lists as folders or buckets that help you keep your leads organized and accessible.
Common Ways to Use Lists
Why Use Lists?
Lists are the foundation of effective lead management in HelloLeads. Here is why they are essential:
Creating Your First List
Creating a new List in HelloLeads is straightforward. Here is what you need to do:
Steps to Create a List
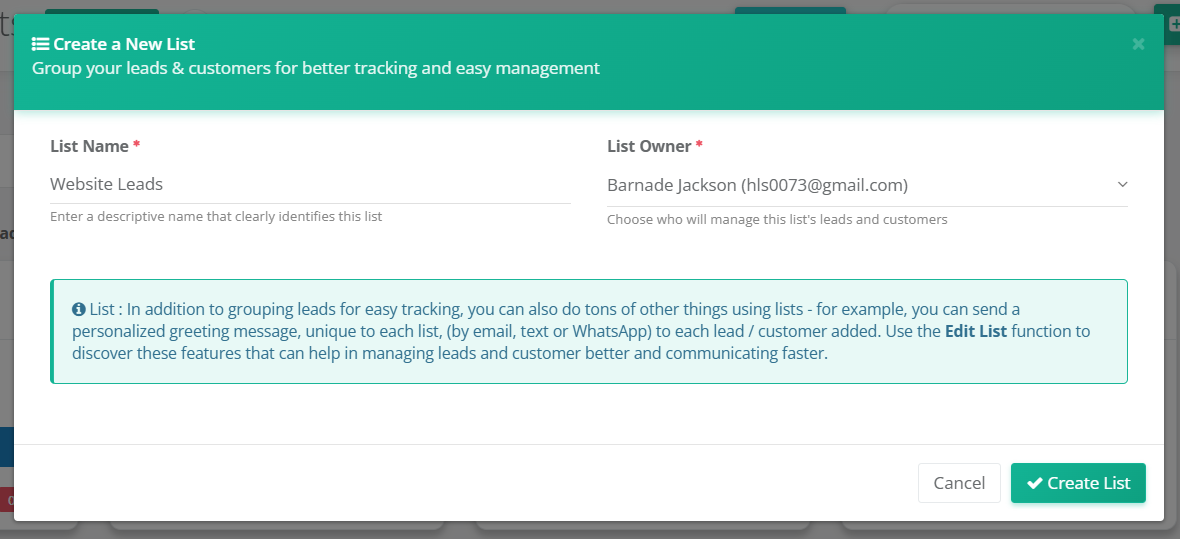
- Click "Create New List" from your Lists dashboard.
- Enter a List Name: Give your List a descriptive name that clearly identifies it. For example, "Tech Expo 2024 Leads" or "New York Enterprise Clients".
- Select a List Owner: Choose which team member will be responsible for managing this List. The List Owner can have full control and access to all features.
- Click "Create List" to finalize.
Tips When Creating a List
- Use clear, descriptive names that anyone on your team will understand.
- Avoid using special characters in the List name.
- Keep the List Owner role assigned to someone who has bandwidth to manage it.
- You can always change the List name or owner later by editing the List.
Editing & Customizing Your List
After creating a List, you can customize it extensively to match your business needs. Click the edit button on any List to access the customization options.
Basic Settings
From the main List page, you can:
- Change List Name: Update the List name anytime.
- Change List Owner: Transfer ownership to another team member.
- View Lead Count: See how many leads are in your List.
Available Configuration Tabs
The Edit List page includes multiple tabs for different customizations. Below is a detailed guide for each:
1. Inquiry Forms
Step-by-Step Guide:
- View Your Form URL: Each List automatically has a unique Hello Form URL. Copy this URL from the "Form URL & Access" section.
- Three Ways to Use Your Form:
- Direct Sharing: Share the URL directly with contacts via email, social media, or messaging.
- Embed on Website: Copy the embed code and share it with your web team to place the form on your site.
- QR Code Banner: Print the QR code banner and display it in your booth, reception area, or tradeshow to collect leads in person.
- Customize Your Form: Click "Edit Form" to customize the form fields, colors, and messages to match your brand.
- Preview Before Sharing: Use the "Preview" button to see how your form looks before sharing it with customers.
- Download QR Code: Download the QR code image to print and display at your tradeshow booths or reception areas.
2. Instant Communication
Step-by-Step Guide (Email):
- Enable Greeting Email: Toggle "Send Greeting Email" ON to enable automatic email greetings.
- Select Email Template: Choose from pre-designed templates or manage templates to create your own.
- Customize Subject Line: Enter a compelling subject line that encourages opens (e.g., "Welcome! We are excited to help you").
- Write Email Content: Use the rich text editor to compose your greeting message. Include company details, value proposition, and call-to-action.
- Attach File (Optional): Add a PDF, image, or document (max 5 MB) to include with your email (e.g., product brochure, special offer).
- Save Configuration: Click "Save Configuration" to activate automatic email greetings.
Step-by-Step Guide (SMS / Text):
- Setup SMS Provider: Ensure SMS is configured in your account settings (if not, you will see a prompt to configure it).
- Enable Greeting SMS: Toggle "Send Greeting SMS" ON.
- Select SMS Template: Choose from available SMS templates or create a new one.
- Save SMS Config: Click "Save SMS Config" to enable automatic text messages to new leads.
Step-by-Step Guide (WhatsApp):
- Setup WhatsApp Provider: Ensure WhatsApp is configured in your account (check with Interakt or WATI provider).
- Enable WhatsApp Message: Toggle "Send WhatsApp Message" ON.
- Select WhatsApp Template: Choose an approved WhatsApp template from your provider.
- Save Configuration: Click "Save WhatsApp Config" to activate WhatsApp greetings.
3. Distribute Leads
Rule Types Available:
Specific User
All new leads are automatically assigned to one designated team member. Use this when you want one person to handle all leads from this List.
How to set up: Click "Add Rule" "Specific User" Select the team memberRound-Robin 👑Enterprise Plan
Leads are distributed evenly among selected team members in rotation. Each person gets the next lead in turn, ensuring fair workload distribution.
How to set up: Click "Add Rule" "Round-Robin" Select multiple team membersKeep Unassigned 👑Enterprise Plan
Leads are added to the List but NOT automatically assigned. Your team can manually review and assign them later based on specific criteria.
How to set up: Click "Add Rule" "Keep Unassigned"Step-by-Step Guide:
- Choose a Rule Type: Click "Add Rule" and select from Specific User, Round-Robin, or Keep Unassigned.
- Select Team Members: For Specific User or Round-Robin, select the team members who will receive leads.
- Verify Rule Status: The current rule and assigned users are displayed in the "Current Rule" section.
- Change Rules Anytime: You can modify the rule at any time by adding a new rule (the old rule will be replaced).
4. Custom Fields
Step-by-Step Guide:
- Map Existing Fields: Use the "Map existing field to this list" dropdown to add pre-created custom fields from your organization to this List.
- Select Fields to Map: Check the fields you want to use for this List (e.g., Company Size, Industry, Budget, Timeline).
- Create New Fields: Click "Create New Field" if you need a field that does not exist yet. Name the field and select its type (text, number, dropdown, etc.).
- Mark as Required: Check the "Required" checkbox for fields that must be filled in when adding leads.
- View Mapped Fields: All mapped fields appear in the table below. You can see their type and whether they are required.
- Reorder Fields: (Coming Soon) Arrange your custom fields in the required order to match your data collection workflow.
- Unmap Fields: Click "Unmap" to remove a field from this List if it is no longer needed.
5. Connected Apps
Step-by-Step Guide:
- View Connected Apps: This tab shows all integrations currently connected to this List.
- Add New Integration: Click "Add More Integrations" to browse and connect new apps.
- Deactivate Integration: Click "Deactivate" to disable the integration temporarily without removing it permanently.
- Move Integration: Use the "Move" button to transfer an integration to a different List.
- Remove Integration: Click "Delete" to disconnect an app from this List.
6. User Access Enterprise Plan Only
Step-by-Step Guide:
- View Current Users: The table shows all team members who have access to this List with their names, emails, and roles.
- Add Users: Click "Map Users" to select additional team members to grant access to this List.
- Select Users: Check the boxes next to the names of users you want to add.
- Map Users: Click outside the dropdown to apply the changes and grant access.
- Remove User Access: Click "Remove" next to any user to revoke their access (List Owner cannot be removed).
- Sort and Search: Use the column headers to sort users by name, email, or role. Use the search box to find specific users.
7. List Statistics
Key Statistics Available:
- Pipeline Distribution: Breakdown of leads by their current stage (New, Qualified, Converted, Lost, etc.).
- Lead Source: Shows which channels or sources are bringing the most leads (acquisition channel breakdown).
- Tags Analytics — Distribution by applied tags
- Lead Potential — High, Medium, Low breakdown
- Customer Segments: Distribution of leads by customer group or segment.
- Product Categories: Shows lead interest breakdown by product group or category.
- Assigned To Users: Individual metrics showing each team member's lead count and distribution.
- No Follow-up: Leads within your team that currently have no follow-up dates scheduled.
- Follow-up Overdue: Tracks leads with follow-ups that are past their scheduled date.
- Tags Analytics: Distribution by applied tags.
- Lead Potential: High, Medium, Low breakdown.
Advanced Features
Beyond the 7 configuration tabs, Lists also offer powerful tools for cloning and auditing changes.
Clone a List
Need to create a similar List quickly? Use the Clone feature to:
- Duplicate all settings, configurations, and customizations from an existing List.
- Save time when creating multiple Lists with similar structures.
- Keep your configuration consistent across related Lists.
How to use: From the List dashboard, click the "Clone" button on any List card to create an exact copy with a new name.
View Modification History
Keep track of all changes made to your List:
- See who made changes and when.
- View what specific settings were modified.
- Audit trail for compliance and accountability.
- Helpful for understanding how your List has evolved over time.
How to use: From the List header, click the "Change History" button to see a timeline of all modifications to the List.