✅ How to Use Hello To-do in HelloLeads CRM
Step-by-Step Tutorial - Create, assign, and track tasks linked to your leads
Available in
1
Getting Started: Access Hello To-do
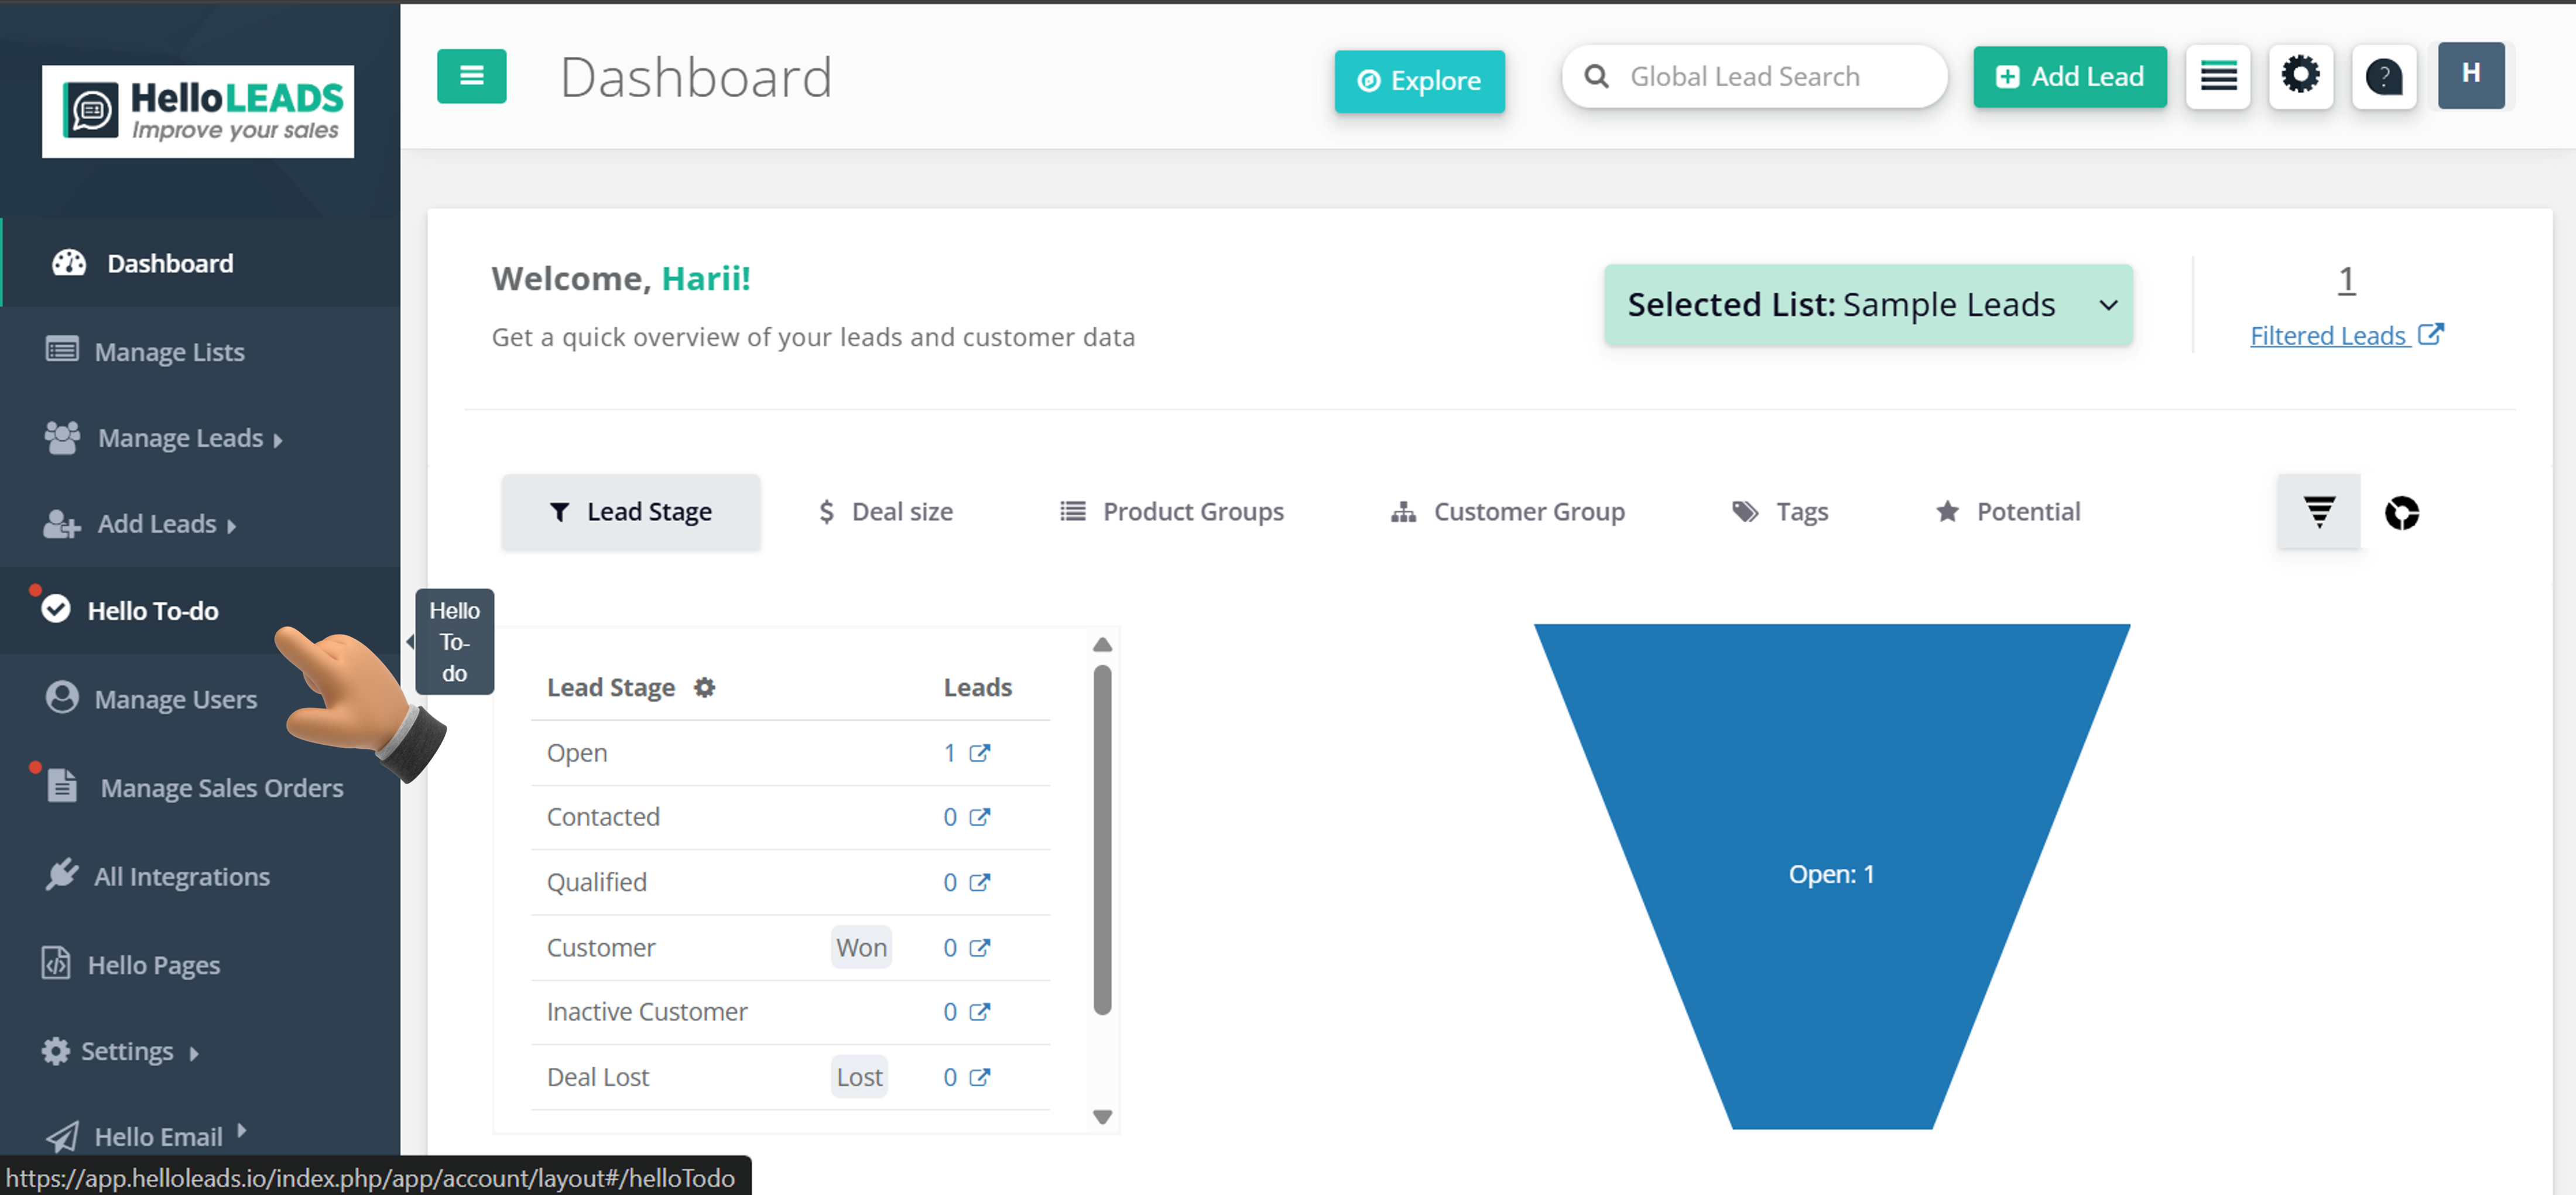
Hello To-do is your central task hub inside HelloLeads CRM. Navigate to the To-do section to start managing all your tasks, follow-ups, and action items linked directly to your leads and customers.
Log into your HelloLeads CRM account — Web app
Look for the navigation menu (usually on the left sidebar)
Click on "Hello To-do" or "Tasks" in the navigation menu
You should now see the Hello To-do dashboard screen
🔥 Before You Begin - Quick Checklist
- Make sure you have at least one lead/customer — Tasks are linked to leads, so you will need one to assign a task to
- Know your role — Admins/Managers see all tasks; L1/L2 users see only their own tasks
- Tasks can be edited anytime — So feel free to create and explore without worry
- You can also add tasks from Lead Details — Hello To-do is available inside the lead details page too
2
Understanding the To-do Dashboard
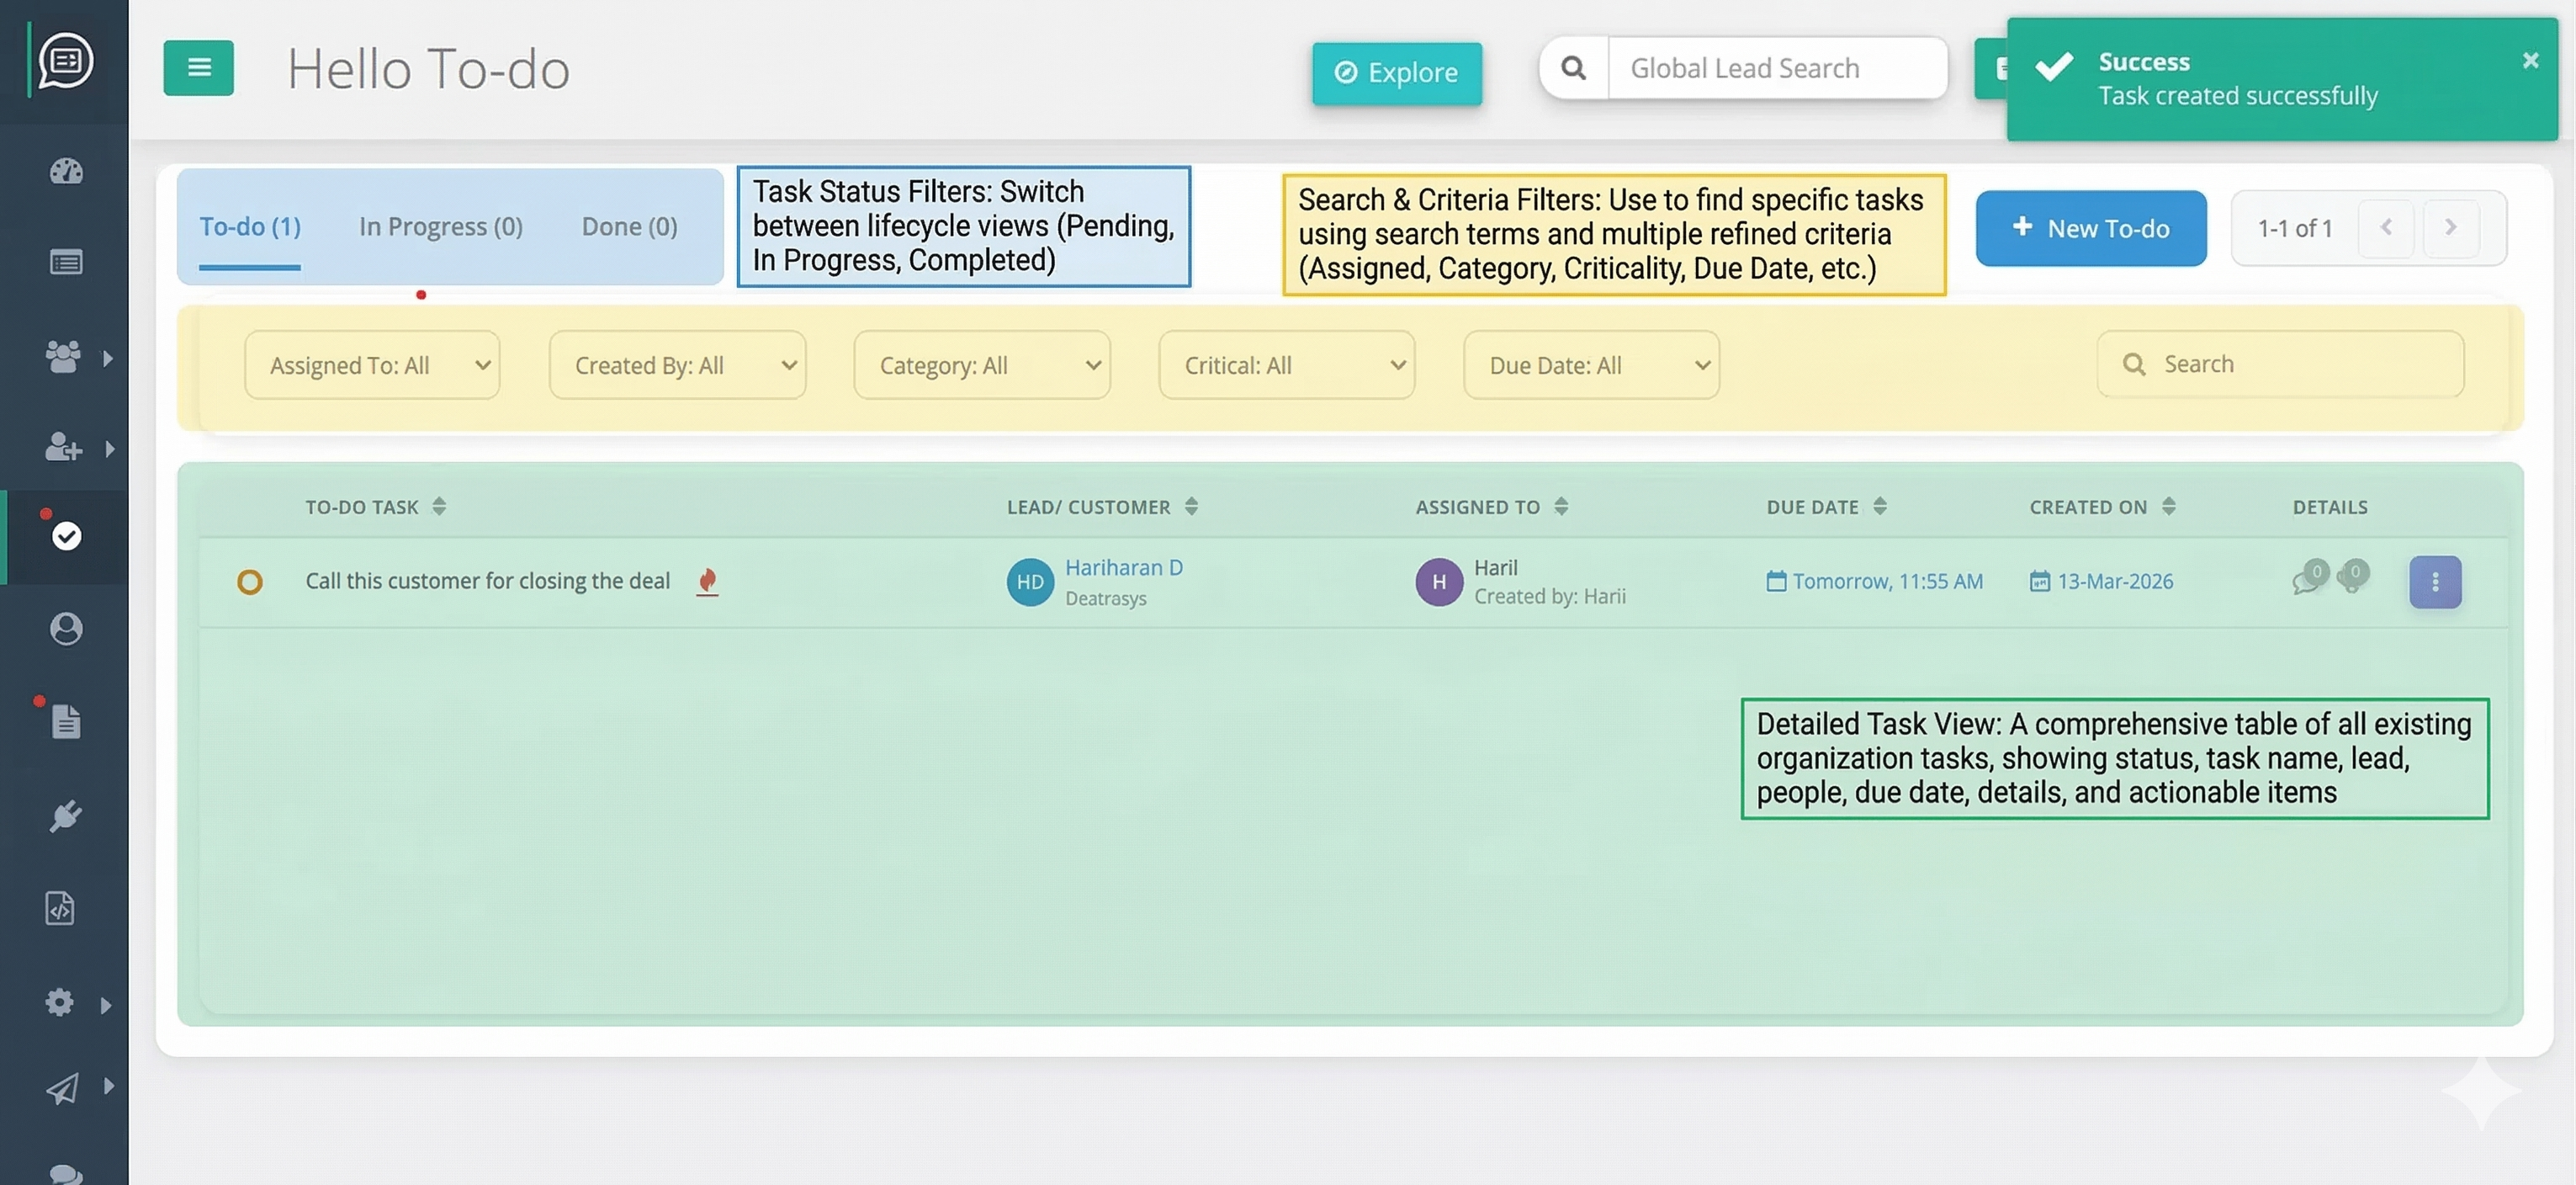
The Hello To-do dashboard gives you a bird's-eye view of all tasks across your organisation. Let's understand the key areas before creating your first task.
Look for the blue "+ New To-do" button in the top-right area
See the task table showing all existing tasks (organised by status tabs)
Notice the search and filter options at the top of the table
Tasks show: Status, Task Name, Lead, Assigned To, Due Date, Time Taken, and Actions
Status Tabs
Switch between task views using the tabs at the top:
• To-do — Pending tasks not yet started
• In Progress — Tasks actively being worked on
• Done — Completed tasks
• To-do — Pending tasks not yet started
• In Progress — Tasks actively being worked on
• Done — Completed tasks
Table Columns
The task table has 8 key columns:
• Task name (with category badge)
• Lead/Customer name
• People (Assigned To + Created By stacked)
• Due Date
• Time Taken
• Details counter
• Actions (3-dot menu)
• Task name (with category badge)
• Lead/Customer name
• People (Assigned To + Created By stacked)
• Due Date
• Time Taken
• Details counter
• Actions (3-dot menu)
3
Creating a New To-do
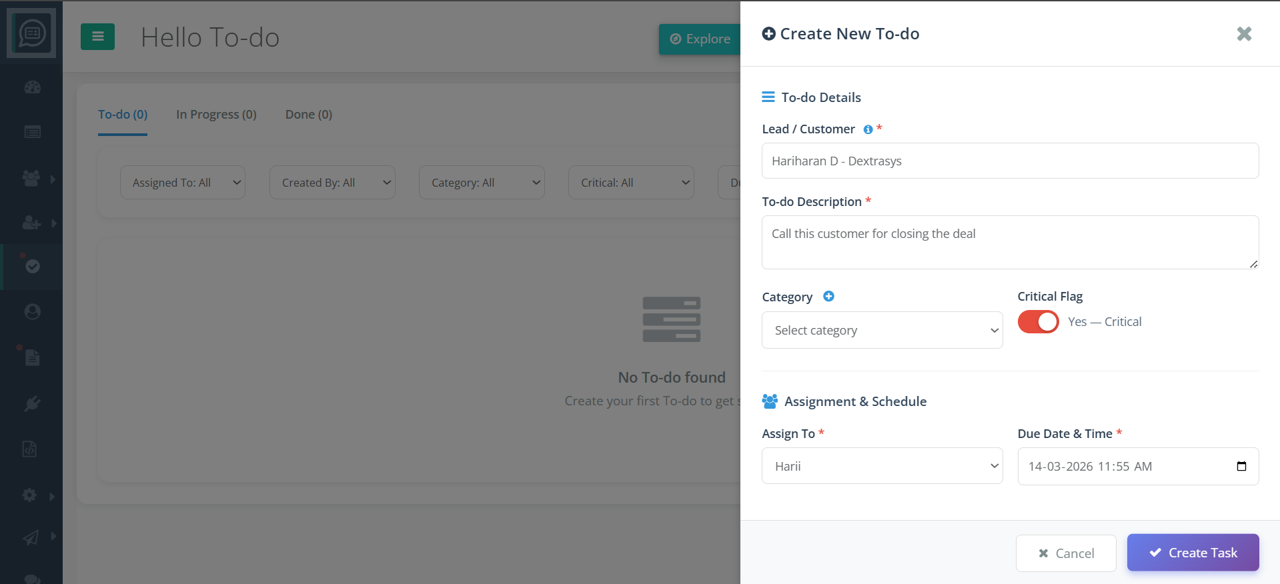
Creating a task is fast and simple. You can link it to a lead, assign it to a team member, set a due date, and add a category — all from one drawer panel that slides in from the right.
Step 3.1: Click the blue "+ New To-do" button in the top-right
Step 3.2: A drawer panel slides in from the right — this is your task creation form
Step 3.3: Search for and select the lead/customer this task is related to
Step 3.4: Fill in the task name, description, category, critical flag, and due date
Step 3.5: Select the team member to Assign To
Step 3.6: Click "Create Task" — your task is now live!
Task Fields Explained
Description — Detailed instructions or context
Category — Group tasks (Call, Meeting, Follow-up, etc.) or add a new custom category
Due Date & Time — When the task should be completed
Critical — Flag urgent tasks for quick visibility
Assign To — Delegate to a team member
Category — Group tasks (Call, Meeting, Follow-up, etc.) or add a new custom category
Due Date & Time — When the task should be completed
Critical — Flag urgent tasks for quick visibility
Assign To — Delegate to a team member
💡 Task Creation Tips
- Link tasks to leads — Tasks linked to a lead appear in Lead Details too, so nothing gets missed
- Use categories consistently — This helps with filtering and reporting later
- Set realistic due dates — Due dates drive the overdue and "days left" indicators on the dashboard
- Flag critical tasks — Use the Critical toggle for high-urgency follow-ups
4
Managing Tasks — Status, Edit & Delete
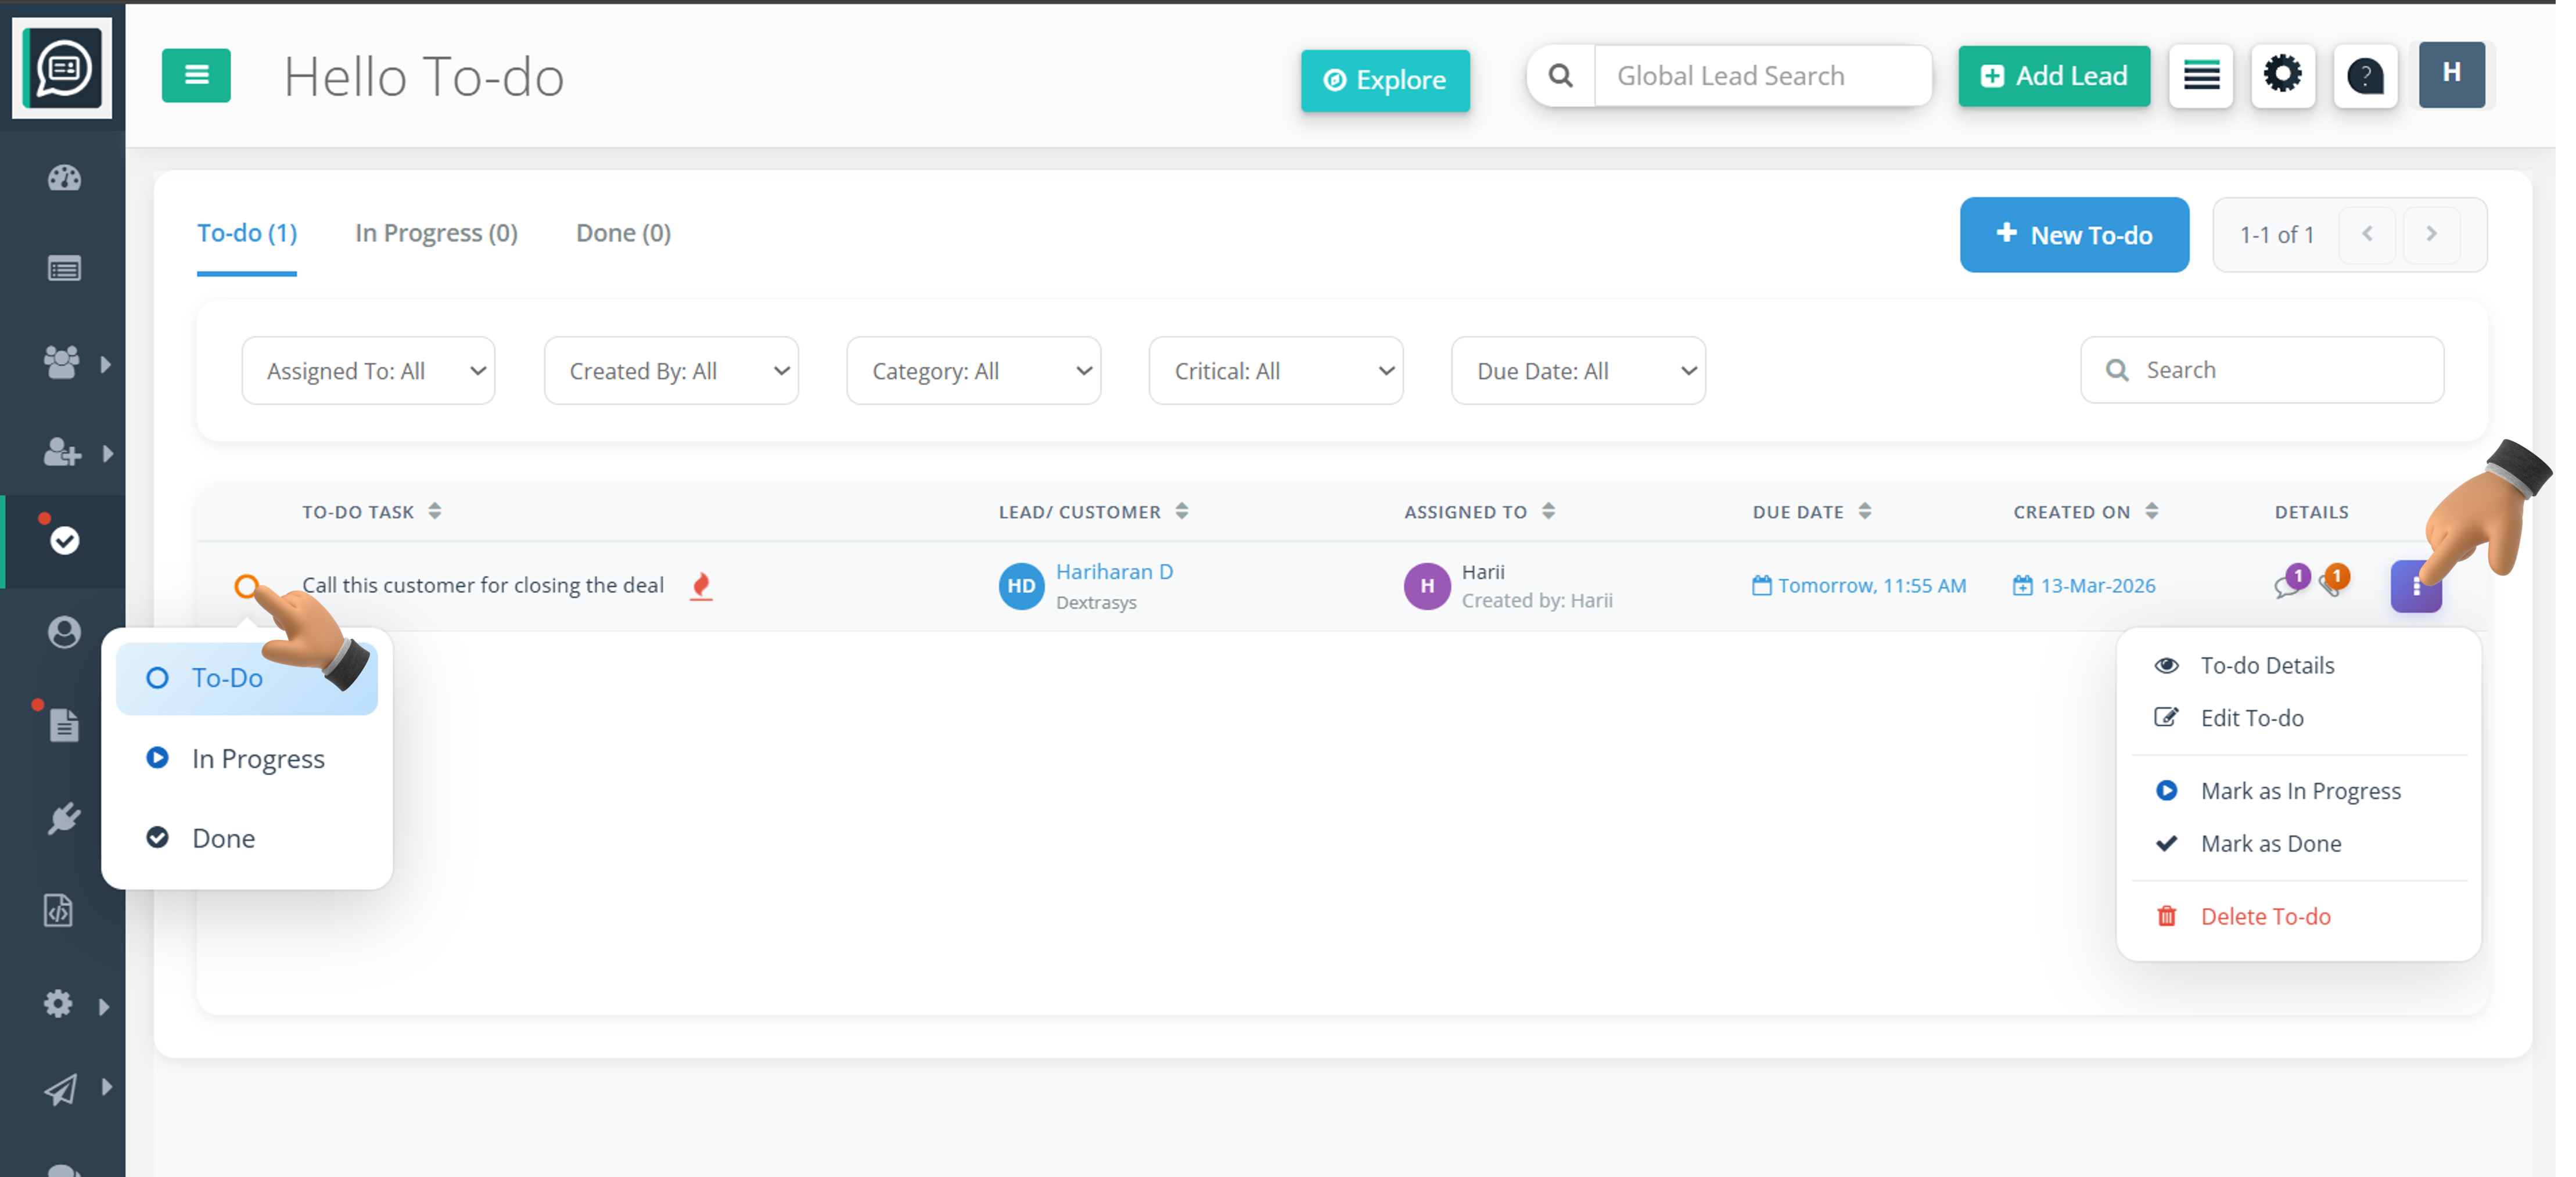
Once tasks are created, you can update their status as work progresses, edit details, or remove tasks you no longer need. Use the 3-dot actions menu on each row for full control.
Click the 3-dot (⋮) menu in the Actions column to access all options
Select "View" to open the task details — notes, attachments, and activity
Select "Edit" to modify task details in the edit drawer
Select "Delete" and confirm in the dialog to permanently remove the task
5
Notes & Attachments
Every task supports rich collaboration through notes and file attachments. Open the View drawer for any task to add comments, upload files, and keep a full activity history — all in one place.
Click the 3-dot menu → View on any task to open the detail drawer
Switch to the "Notes" tab to read existing comments or type a new note
Switch to the "Attachments" tab to view or upload files associated with the task
Click "Upload File" to attach documents, images, or PDFs (files are stored securely in S3)
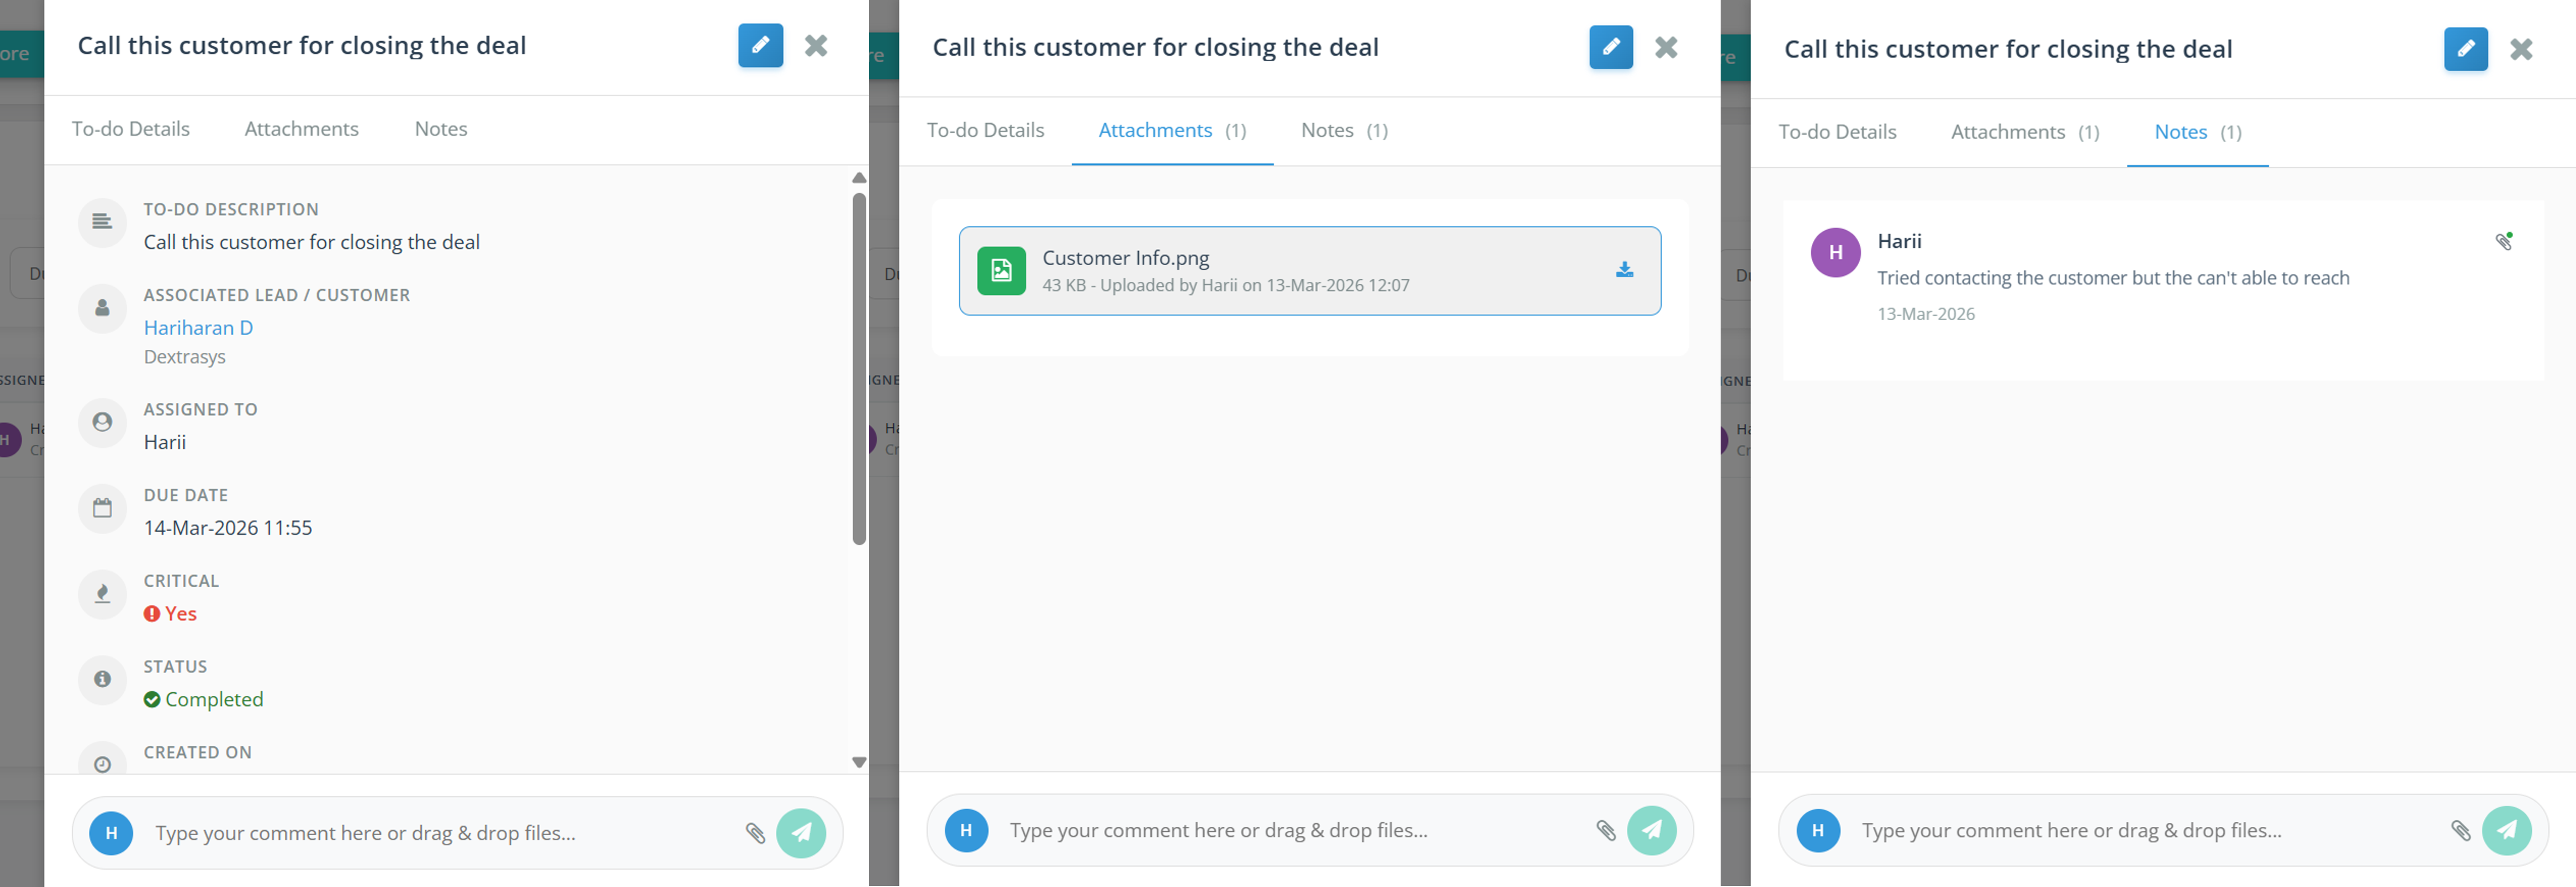
📋 View Drawer Tabs Overview
Details Tab
See the full task information including task name, description, linked lead, assigned user, category, critical flag, due date, and status.
Notes Tab Team Chat
Add and read team notes. Each note shows who wrote it and when. Supports file attachments per note for rich context.
Attachments Tab
Upload and manage files linked to the task. Supports multiple file types with secure S3 cloud storage and easy download access.
Activity Tab Auto-Track
A full audit trail of every change made to this task — status updates, edits, assignments — automatically logged with timestamps.
6
Manage To-do Categories
To help you organize your Hello To-dos more efficiently, HelloLeads CRM now provides a dedicated Manage To-do Categories section. Instead of creating categories while adding individual To-dos, you can now manage all your categories from one centralized location. This makes it easier to maintain consistent category names across your organization and keeps your To-dos well organized.
Benefits
• View all your To-do Categories in one place.
• Create reusable categories for different types of tasks.
• Rename categories anytime without updating each To-do manually.
• Delete categories that are no longer required.
• Changes automatically reflect across all associated Hello To-dos.
• Create reusable categories for different types of tasks.
• Rename categories anytime without updating each To-do manually.
• Delete categories that are no longer required.
• Changes automatically reflect across all associated Hello To-dos.
Accessing Manage To-do Categories
Steps:
1. Login to the HelloLeads CRM Web App.
2. Navigate to Hello To-do.
3. Click Manage Categories on the top-right corner.
4. The Manage Categories panel opens.
1. Login to the HelloLeads CRM Web App.
2. Navigate to Hello To-do.
3. Click Manage Categories on the top-right corner.
4. The Manage Categories panel opens.
Add a New Category
Creating categories helps your team organize similar To-dos under meaningful labels.
Steps:
1. Open Manage Categories.
2. Enter the category name.
3. Click Add.
4. The category is immediately available while creating or editing Hello To-dos.
Steps:
1. Open Manage Categories.
2. Enter the category name.
3. Click Add.
4. The category is immediately available while creating or editing Hello To-dos.
Edit a Category
You can rename any existing category whenever required.
Steps:
1. Open Manage Categories.
2. Click the Edit icon beside the category.
3. Update the category name.
4. Save the changes.
Note: Once a category is renamed, all existing Hello To-dos using that category are automatically updated to display the new category name.
Steps:
1. Open Manage Categories.
2. Click the Edit icon beside the category.
3. Update the category name.
4. Save the changes.
Note: Once a category is renamed, all existing Hello To-dos using that category are automatically updated to display the new category name.
Delete a Category
Categories that are no longer required can be removed.
Steps:
1. Open Manage Categories.
2. Click the Delete icon beside the category.
3. Confirm deletion.
Note: If the deleted category is already associated with existing Hello To-dos, the category will automatically be removed from those To-dos.
Steps:
1. Open Manage Categories.
2. Click the Delete icon beside the category.
3. Confirm deletion.
Note: If the deleted category is already associated with existing Hello To-dos, the category will automatically be removed from those To-dos.
Role-based Access & Mobile App
Role-based Access:
• Account Owner, Manager = View, Add, Edit & Delete Categories.
• L1 User, L2 User = View existing Categories and assign them to To-dos.
Mobile App Availability:
• Currently available in the HelloLeads CRM Web App.
• Any categories created, renamed, or deleted from the Web App will automatically synchronize with your existing Hello To-dos in the Android application.
• A dedicated category management screen for Android and iOS will be introduced soon.
• Account Owner, Manager = View, Add, Edit & Delete Categories.
• L1 User, L2 User = View existing Categories and assign them to To-dos.
Mobile App Availability:
• Currently available in the HelloLeads CRM Web App.
• Any categories created, renamed, or deleted from the Web App will automatically synchronize with your existing Hello To-dos in the Android application.
• A dedicated category management screen for Android and iOS will be introduced soon.
7
Filters, Search & Column Sorting
With potentially hundreds of tasks across your team, Hello To-do's powerful filtering, search, and sorting tools help you instantly find exactly what you need.
Use the Search box to instantly filter tasks by task name or lead name
Use dropdown filters for Critical, Assigned To, Created By, Category
Use Due Date presets — Today, This Week, Overdue, or a custom date range
Click any column header to sort tasks ascending or descending by that column
Available Filters
• Search Text — Task name or lead
• Assigned To — Filter by team member
• Created By — Filter by creator
• Category — Filter by task group
• Critical — Show only critical tasks
• Due Date — Today, This Week, Overdue, Custom Range
• Assigned To — Filter by team member
• Created By — Filter by creator
• Category — Filter by task group
• Critical — Show only critical tasks
• Due Date — Today, This Week, Overdue, Custom Range
Sortable Columns
Click column headers to sort by:
• Task Name
• Lead/Customer
• Assigned To
• Created By
• Category
• Due Date
• Created At
• Status
Click again to reverse sort order.
• Task Name
• Lead/Customer
• Assigned To
• Created By
• Category
• Due Date
• Created At
• Status
Click again to reverse sort order.
⚡ Filter Tips for Power Users
- Combine Assigned To + Due Date "Overdue" to quickly see who has pending tasks that are late
- Use the Critical filter in the morning stand-up to review highest-priority items first
- Filter by Created By = yourself to review all tasks you have delegated
- Active filters are shown as tags below the filter bar — click the ✕ on a tag to remove just that filter
- Use "Clear All Filters" to quickly reset to the full task list
8
Advanced Features & Role-Based Access
Hello To-do is built with team productivity in mind. Advanced features include role-based visibility, pagination, task counts, notifications, and seamless integration with Lead Details.
Role-Based Task Visibility
Access is automatically scoped by role:
• Account Owner / Manager — See ALL tasks across the organisation
• L1 / L2 User — See only tasks assigned to, previously assigned to, or created by themselves
• Account Owner / Manager — See ALL tasks across the organisation
• L1 / L2 User — See only tasks assigned to, previously assigned to, or created by themselves
Push Notifications Auto
When a task is created or updated, push notifications are automatically sent to:
• The assigned team member
• The task creator
Keeping everyone in sync without manual follow-up.
• The assigned team member
• The task creator
Keeping everyone in sync without manual follow-up.
Integration with Lead Details
Hello To-do is also available inside individual Lead Details pages. Any task created from the lead details view is synced back to the main To-do dashboard instantly, giving you full visibility from both places.
Pagination & Task Counts
The dashboard supports paginated views (10 tasks per page by default). Tab badges show real-time counts for:
• Total To-do tasks
• In Progress tasks
• Done tasks
Pagination controls sit in the top-right for easy navigation.
• Total To-do tasks
• In Progress tasks
• Done tasks
Pagination controls sit in the top-right for easy navigation.
Confetti on Completion 🎉
Mark a task as Done and celebrate with a confetti animation! A small but motivating touch that acknowledges your team's hard work every time a task is completed.
Web-First Design
Hello To-do is a web-first feature fully accessible from any browser. The responsive design adapts to different screen sizes, giving your team full task management capabilities from desktops and tablets.
Pro Tips for Maximum Productivity
- Use the In Progress tab as your daily work queue — only move tasks there when you are actively working on them
- Always link tasks to a lead so the full context is available in the lead's timeline
- Add a note when updating a task status so team members understand why something was completed or cancelled
- Use categories like "Call", "Email", "Meeting", "Follow-up" to get quick filter reports by task type
- Attach relevant files (proposals, agreements) directly to tasks so nothing gets lost in emails
- Review the Overdue due date filter every morning to prioritise your day
- Assign tasks even for your own follow-ups — the assignment creates accountability and notifications
- Use the Critical toggle sparingly so it retains its urgency signal for the team
Workflow Best Practices
- 📅 Daily Review: Start every day by checking the Overdue filter and In Progress tab
- 🔁 Status Discipline: Keep statuses accurate — it helps managers track progress without needing meetings
- 📎 Document Everything: Upload meeting notes, call summaries, and customer documents as attachments
- 🏷️ Consistent Categories: Agree as a team on standard category names for clean reporting
- 🔔 Notifications: Rely on push notifications to stay updated without manually checking the dashboard